
Data Extraction (OCR to table)
Transcribe & parse: turn protologues and other documents from PDFs, photos or Word into Excel/CSV tables.
Data Extraction reads documents such as protologues, monographs or specimen labels and organises their content into a table: one row per taxon, with columns such as scientific name, author, type specimen, locality and diagnosis. You can review and edit the result, then save it as Excel or CSV.
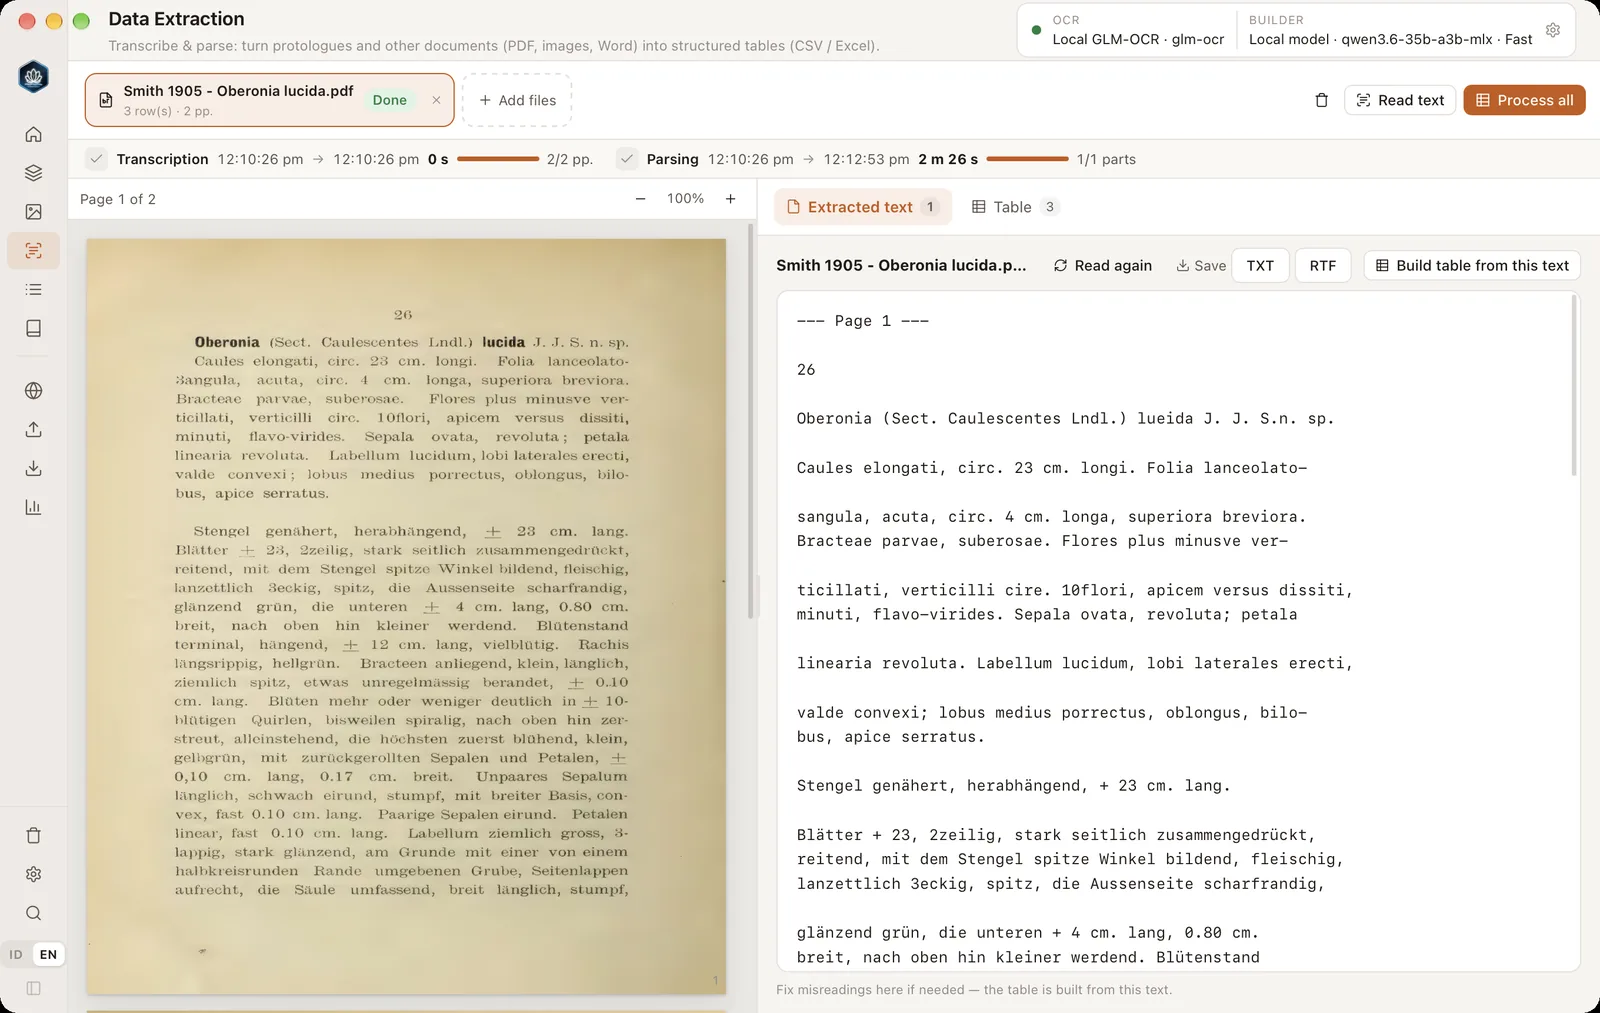
- 1Data ExtractionThe sidebar item, below Glossary. On this page the sidebar is always compact to keep the screen wide.
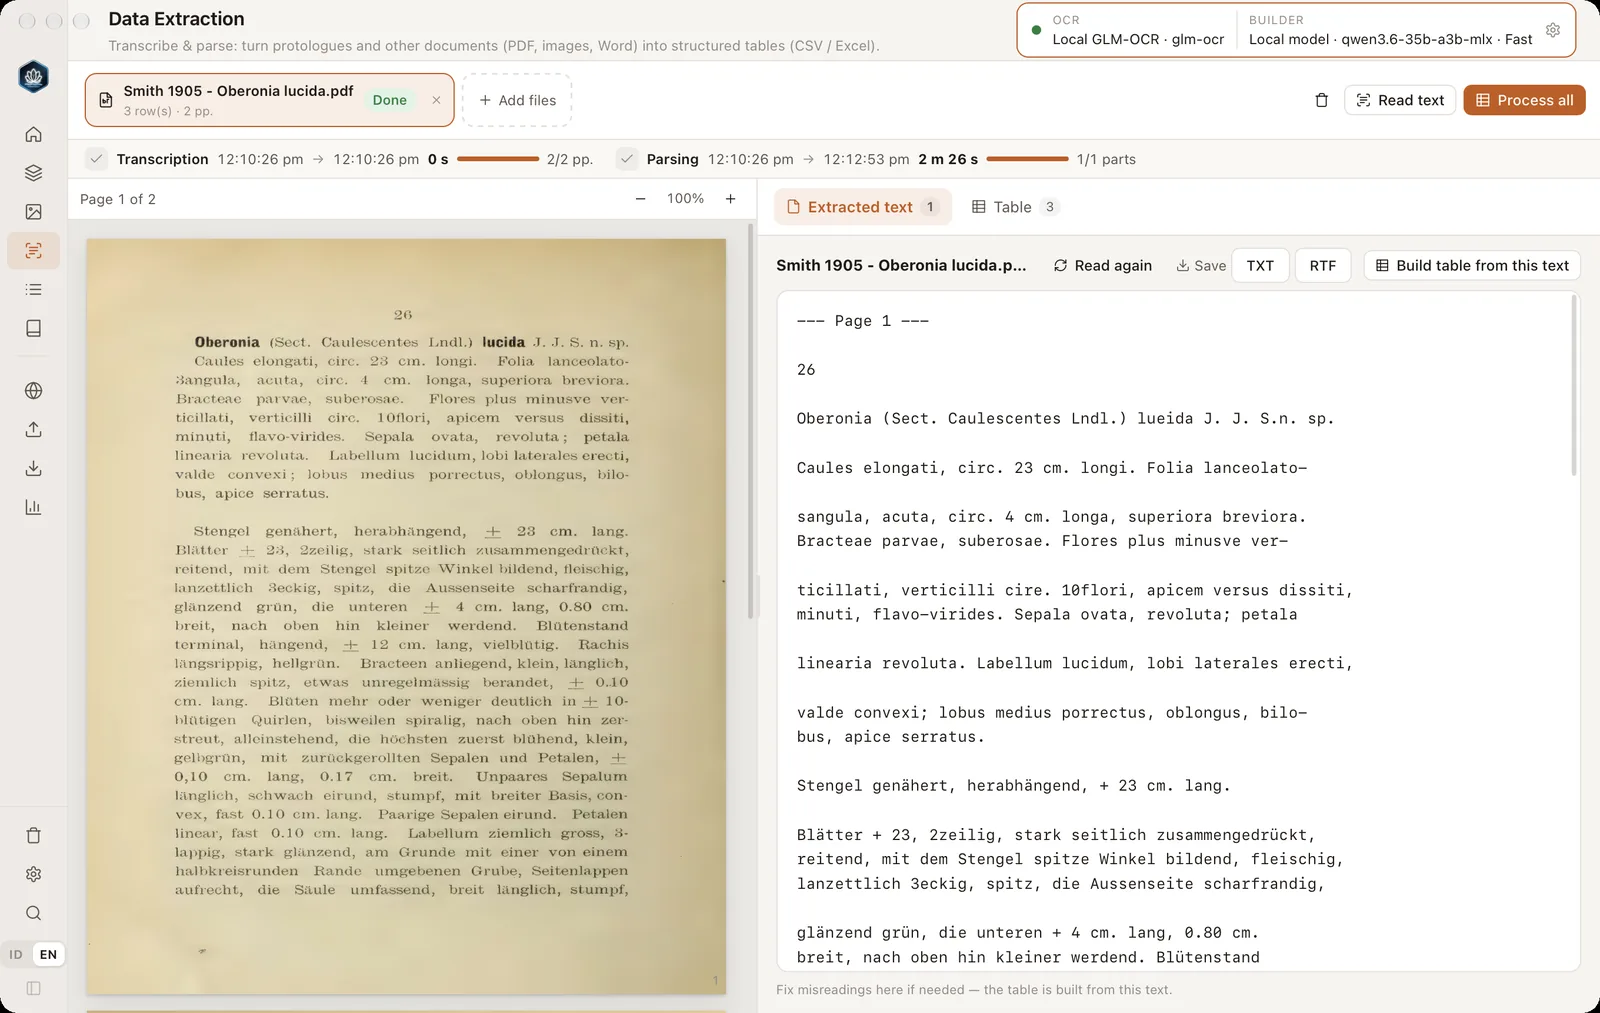
- 2OCR engine & builderThe reading engine (local GLM-OCR or the z.ai API) and the language model that builds the table. Click to set them up.
- 3FilesOne chip per file, with its status and progress (pages or parts). Click to select.
- 4Add filesPDF, page photos, DOCX/DOC/ODT/RTF or TXT. You can also drop them onto the window.
- 5Read text · Process allRead text only extracts the text. Process all reads and then builds the table. While running it becomes Stop.
- 6Original documentPDF pages, an image or document text. Scrollable; follows the page being read by OCR.
- 7Page & zoomThe page in view, plus zoom out/in. Click the percentage to return to full width.
- 8DividerDrag to split the width between the original and the results. Double-click restores the default.
- 9Text · TableThe extracted text per file, and the combined table of all files.
- 10Extracted textEditable. Fix misreadings here before building the table.
- 11Processing timeStart time, finish time, duration and progress of the Transcription and Parsing steps; an estimated finish time is shown while a step runs.
- 12Save TXT / RTFSaves the transcription as plain text or RTF (opens in Word, Pages, TextEdit).
How it works#
- Transcription (reading the text). PDFs that already contain text are read directly. Scanned pages and photos are read with GLM-OCR, an OCR model made for documents that also handles old Latin and German text well. Word documents (.docx, .doc, .odt, .rtf) and .txt are read without OCR.
- Parsing (building the table). A language model sorts the text into the table's columns. Cell values are copied from the text, not invented. Columns without information are left empty.
Both steps can run entirely on your computer (offline and free), or use online services.
Setting up the OCR engine & builder#
Click the OCR · Builder box at the top right, or open Settings → Data Extraction & OCR.
Local GLM-OCR (recommended)
Free, offline, and your documents never leave your computer. The model is about 2 GB and is downloaded once.
- LM Studio: open the Discover/Explore tab, search for
glm ocrand download GLM-OCR in MLX format (Apple Silicon Macs; choose bf16 for the best accuracy or the slightly smaller 8bit) or GGUF (Windows). Load the model and start the server in the Developer tab. Server address:http://localhost:1234/v1; model name as shown in LM Studio. - Ollama: run
ollama pull glm-ocrin Terminal. Default server address:http://localhost:11434/v1, model nameglm-ocr.
Press Test OCR engine. When it works, a green "local GLM-OCR ready" message appears.
z.ai API
No model download. Paste your z.ai API key (stored in the Keychain/Credential Manager), then test. Files are sent to z.ai only when you press Read or Process, and z.ai bills per page. z.ai limits: images ≤ 10 MB, PDFs ≤ 50 MB.
Table builder
Choose Same as AI Assistant (uses the provider and model from the AI Assistant), or pick one yourself: Anthropic, OpenAI, Gemini, a local model (LM Studio/Ollama) or z.ai (GLM). For local models, use a model of at least 14B, for example Qwen, with a context of at least 16,000 tokens.
The PDF text layer is the invisible text behind the page image (the text you can select and copy). The Use the PDF text layer when present and readable option (on by default) reads text PDFs directly, without OCR, so it is much faster. In scanned PDFs this layer often comes from a poor older OCR, for example with letters separated by spaces ("t h e v a r i e t i e s"). Such pages are detected automatically and re-read with GLM-OCR; their number is shown above the Extracted text box. Turn the option off to re-read every page with OCR.
Step by step#
- Open Data Extraction in the sidebar, below Glossary.
- Drop files onto the window, or click + Add files. Supported formats: PDF, JPG/PNG/TIFF/WEBP, DOCX/DOC/ODT/RTF and TXT. Several files at once are fine.
- Press Read text to extract the text only, or go straight to Process all to read and then build the table.
- Check the Extracted text. Fix misreadings directly in the text box, then press Build table from this text to rebuild from the corrected text.
- Open the Table tab, review and edit the cells, then click Excel or CSV.
The original document beside the results#
The screen is split in two. The left side shows the original document: PDF pages (rendered as they come into view, so a book of hundreds of pages stays light), an image, or the text of a Word document. Scroll to read, and use − / + to zoom. While OCR runs, the viewer follows the page being read. The right side shows the results. Drag the divider in the middle to change the split.
Table & columns#
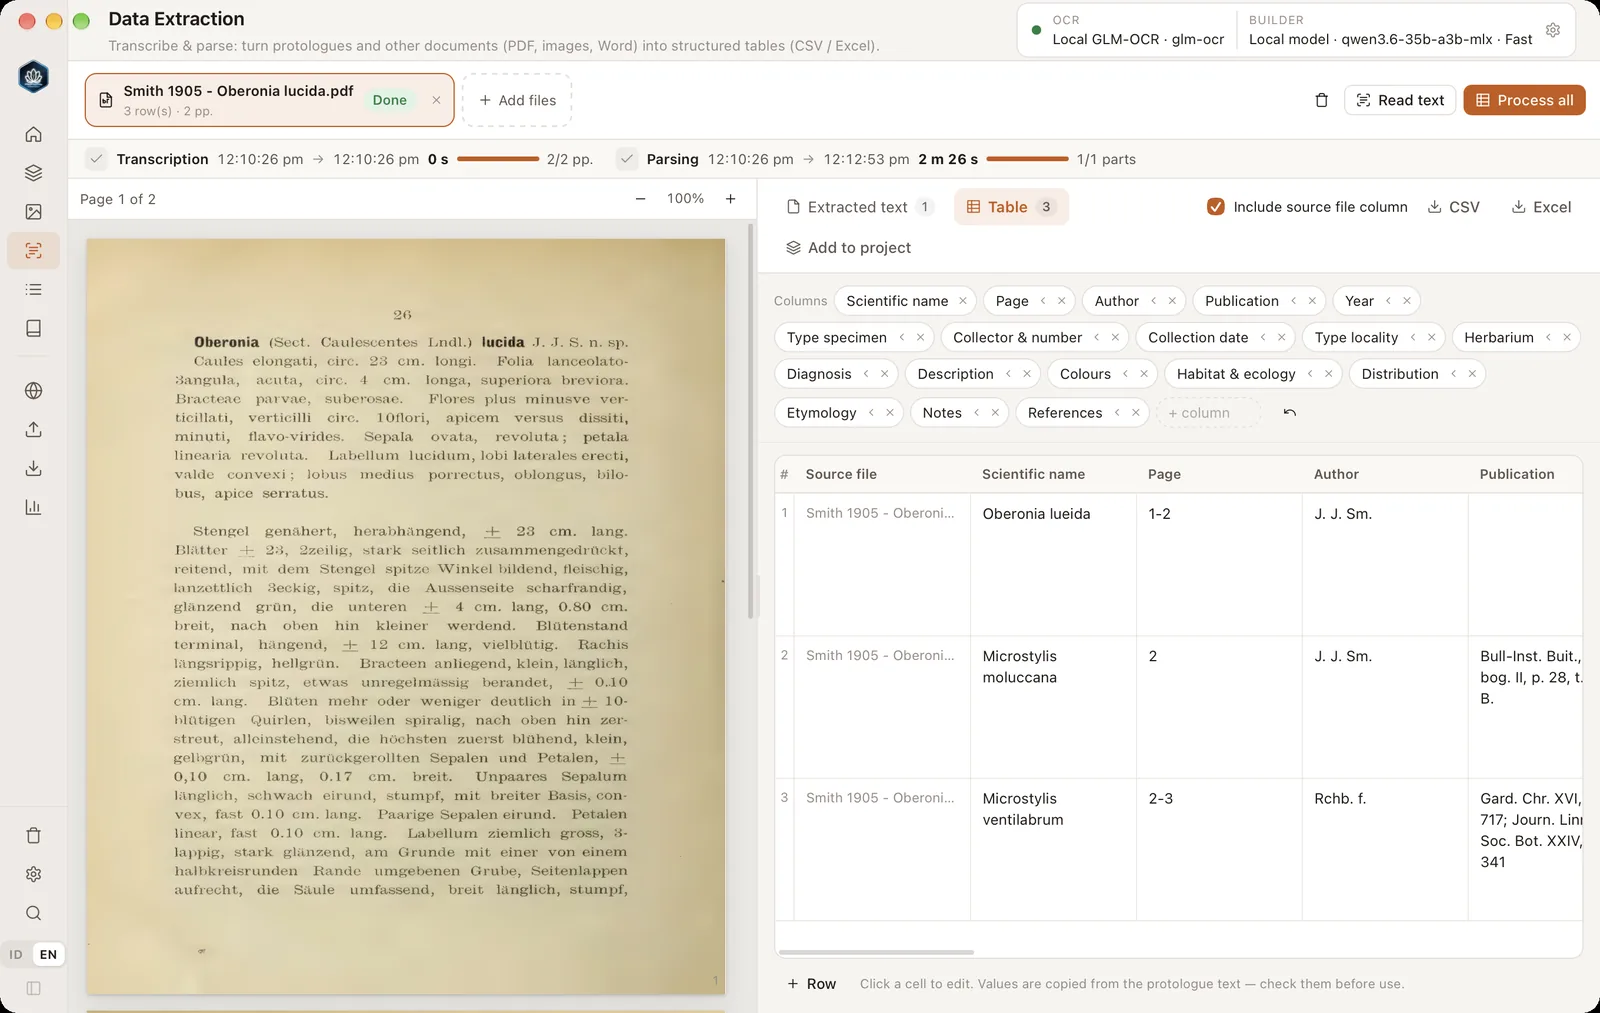
- Default columns: Scientific name, Page, Author, Publication, Year, Type specimen, Collector & number, Collection date, Type locality, Herbarium, Diagnosis, Description, Colours, Habitat & ecology, Distribution, Etymology, Notes and References. Default column names follow the interface language (ID/EN).
- Page is filled from the
--- Page N ---markers inserted between PDF pages in the extracted text (the PDF page number, not the printed one). Colours gathers every colour statement (leaves, flowers, lip, etc.) in one cell. References lists other works the text cites for that taxon, such as a description it follows or compares with. - Managing columns: click a column name to rename it, ‹ moves it left, × deletes it, type in + column and press Enter to add one, and the undo icon restores the defaults. The column set is remembered for next time. Change the columns before building the table, because the model only fills the columns that exist.
- Editing: click a cell to change it. + Row adds an empty row, and the bin icon at the end of a row deletes it.
- Saving: Excel (.xlsx with a frozen header row and filters) or CSV (UTF-8, read correctly by Excel). Tick Include source file column to record where each row came from.
Fast and Thorough modes#
Many modern AI models "think" before answering. Copying data from text into columns rarely needs long reasoning, yet it takes most of the time and cost. Choose the mode in Settings → Data Extraction & OCR or in the engine dialog:
- Fast (default): reasoning is turned off or kept to a minimum. Suits tidy documents, usually 5–10× faster.
- Thorough: the model reasons before building the table. More accurate for OCR text, Latin, or complex protologues, but much slower with local models and more expensive with paid APIs.
Processing time#
Below the file row two steps are shown, Transcription and Parsing, each with start time, finish time (or "running"), duration, progress (pages or parts), and an estimated finish time while the step runs.
Saving the text and adding the table to the project#
- Extracted text: click TXT or RTF next to Save to save the transcription. RTF files open in Word, Pages, or TextEdit.
- Table: click Add to project. The Import page opens with that table. Check the column mapping (Scientific name becomes the scientific name, Author the name author, other columns new topics or topics with the same name), then run the import to add or update taxa.
Long documents#
Long text is built part by part (about 9,000 characters each). The file chip shows "Part N of M" progress and the row count, and rows arrive in the table gradually. A failed part is retried once and then skipped without losing the results of other parts; the number of failed parts is shown on the file chip. Stop halts the process between parts.
With a local model, a whole book can take a while: a 35B model writes about 50–60 tokens per second on an M-series Mac. Smaller models are faster but usually less careful.
Load on your laptop#
Local GLM-OCR and local models run the GPU and CPU at full load, without pause, for as long as the process runs. For long documents that can be tens of minutes. While a local engine is in use, the Data Extraction screen shows a yellow warning banner; click Got it, don't show again to hide it.
- Keep the laptop on a hard, well-ventilated surface (not a bed or cushion), with the charger connected.
- Use a balanced power mode, not Performance/Turbo (for example in Lenovo Vantage, Armoury Crate, or the Windows power settings).
- Older or dusty laptops, or GPUs with little VRAM (≤ 6 GB): use the z.ai API for OCR and an online table builder, or process a few files at a time.
Blank pages and picture pages
PDF pages with almost no ink (white or blank scans) are skipped without OCR, and their number is shown on the file chip ("N blank"). Pages with photos or illustrations are still read by GLM-OCR, since they may contain text. The model still has to process a full-page image, so a few seconds per page is normal.
Load & repetition safeguards
GLM-OCR sometimes gets stuck writing the same text over and over, so a single page can keep the GPU at full load for over a minute. Local OCR output is therefore read while it is being written. When a run of 50 identical words appears 3 times, the model is stopped at once, the repetition is trimmed, and the page is marked needs checking (on the file chip and above the Extracted text box). The default token limit per page is 4,096. By default there is no pause between pages; if your laptop runs hot, set a pause of a few seconds so the GPU can cool down. All four values can be changed under OCR engine → local GLM-OCR → Load & repetition safeguards.